Lee, Kang, Lee, Moon, Kim, and Kim: Evaluation of Thermal Durability of Thermal Barrier Coating and Change in Mechanical Behavior
Abstract
This study investigates changes in the mechanical behavior, such as changes in indentation load-displacement curve, wear resistance and contact fatigue resistance of thermal barrier coatings (TBCs) by thermal cycling test and thermal shock test. Relatively dense and porous TBCs on nickel-based bondcoat/superalloy are prepared; the highest temperature applied during thermal durability test is 1350°C. The results indicate that the porous TBCs have relatively longer lifetime during thermal cycling and thermal shock tests, while denser TBCs have relatively higher wear and contact fatigue resistance. The mechanical behavior is influenced by sintering of the TBCs by exposure to high temperature during tests.
Key words: Coatings, Thermal cycling, Thermal shock, Mechanical properties
1. Introduction
Thermal barrier coatings (TBCs) are used to protect the superalloy components of a gas turbine operating at high temperature, over 1100°C, from the heat generated in the combustion process. The importance of thermal barrier performance is growing because, to increase heat efficiency, gas turbine systems are being commercialized that operate at temperatures above 1600°C. As the operating temperature is increased, thermal barrier materials with better durability and thermal resistance are being developed. Yttria Stabilized Zirconia (YSZ), which is generally applied by plasma spray coating, is extensively used for this purpose at present. 1-5)
When high-temperature gas turbine parts coated with a TBC are exposed to a combustion environment by mechanical actions, the TBC material coated on the surface of the metal parts should provide protection from the heat for a long time. However, TBCs have been reported to be damaged by various causes. The biggest cause of TBC damage is the exfoliation and detachment of the TBC layer from a metal part. This reduction in durability can be caused by changing levels of stress resulting from repeated cycles of thermal expansion and contraction. 6) A report has shown that the detachment caused by the exfoliation of the TBC layer occurs when oxygen in the air contacts the underlying metal by ionic conduction through the zirconia layer. This allows metal oxidation, which produces an oxide layer, and this introduces a difference in thermal expansion coefficient between the produced oxide layer (TGO) and the superalloy. 7)
Besides damage due to thermal causes, TBC damage may result from mechanical causes, including mechanical impacts, resulting from the collisions of micro-particles in the gaseous fuel, or abrasion by gas flow, as well as mechanical fatigue by vibration. These issues highlight the importance of studying the mechanical properties of TBCs. 8)
The present study was conducted to evaluate thermal damage, using a continuous thermal cycle durability test and a repeated thermal shock test. The thermal cycling test was performed by heating the TBC to a maximum temperature of 1350°C and then cooling it, to evaluate the thermal stress durability lifetime in relation to the changes in stress caused by repeated thermal expansion and contraction.
The thermal shock test was performed by repeating a thermal cycle, where a TBC was kept for a certain period of time at 1350°C, while the superalloy substrate was kept at about 1000°C, and then both the TBC and the substrate was rapidly cooled to room temperature.
To evaluate the mechanical properties, a spherical indentation using WC sphere to a certain load level was first performed to obtain and compare indentation load-displacement curves. Second, changes in the frictional coefficient and reductions in weight were measured while sliding the same spherical ball in contact with the TBC under a constant load along a circular track of a constant diameter. Third, damage caused by mechanical fatigue under repeated varying loads was investigated while keeping the same spherical ball in contact with the TBC. These tests were conducted before and after performing each of the thermal durability tests for comparison.
The present study was also specifically conducted to investigate the effect of different microstructures on the lifetime of the TBC layer, by preparing porous TBCs and dense TBCs, and focusing on their thermal and mechanical durability according to the porosity of the TBCs. For this purpose, an air plasma spray was used to coat the superalloy with YSZ powders having different particle shapes, to produce a coating thickness of around 500 μm under optimized process conditions.
The thermal durability test was performed with the coated specimens at a maximum temperature of 1350°C, and the degradation of the mechanical properties was evaluated using the method described above, and by comparing the specimens before and after the durability test.
2. Experimental Procedure
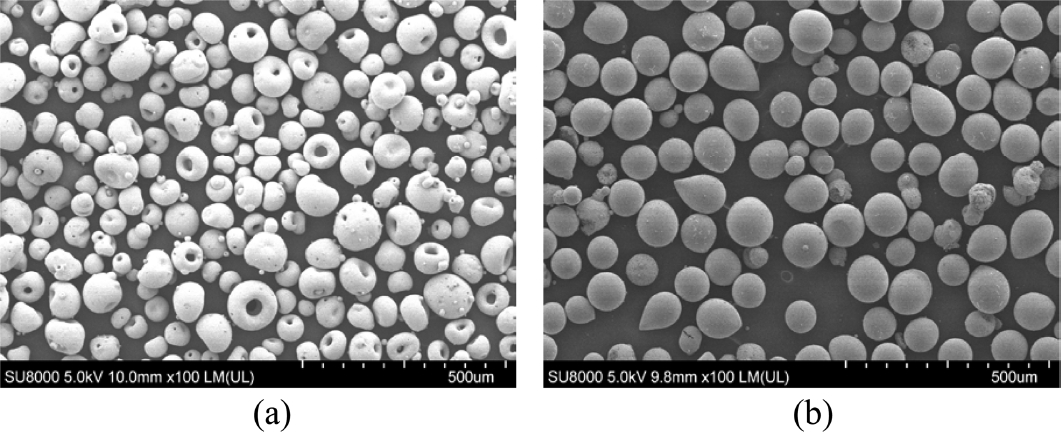
A Ni-based superalloy (Inconel) coin with a diameter of 1 inch (25.4 mm) was prepared as a substrate for the coating of the TBC. In addition, a commercial bondcoat (Ni-Cr-Co-Al-Y, AMDRY9625, Sulzer Metco Co.) with an appropriate thermal expansion coefficient was prepared between the TBC and the substrate. To prepare topcoat materials of different densities to coat the TBC, powders of different particle granules were prepared according to a previous study, as shown in Fig. 1. 9)
YSZ powder purchased from a foreign country (204-XCL, Sulzer Metco Co.) was prepared as a hollow granule, and a solid granule was produced by spray drying YSZ (8 wt% YSZ, Tosoh) prepared from Sewon Hard Facing Company in Korea. Sand blasting was performed using an alumina sand to enhance the bond between the substrate, bondcoat, and topcoat materials.
The bondcoat materials were applied using the high velocity oxygen fuel (HVOF) method to a thickness of about 100 to 200 μm, and the topcoat material was applied using a plasma spray device (APS, 9MB, Sulzer Metco Holding AG, Switzerland) to a thickness of about 500 μm. The microstructure of cross-sections of the coated layers was observed using a scanning electron microscope (SEM).
As shown in Fig. 1, two different powders were supplied to the plasma airflow at a constant supply rate of 60 g/min with a mixture gas of Ar/He. The electric current was kept constant at 530 A. The distance between the spray gun and the substrate to be coated was kept at 125 mm for spraying. The moving rate of the spray gun was maintained at 300 mm/sec for the coating of the YSZ powder until the layer was formed to a predetermined thickness. To observe the surface pores and cracks after the prepared TBC specimens were cooled to room temperature, the surface was polished using successive diamond suspensions of 10, 6, 3, and 1 μm. For uniform polishing, the thickness of the specimens was measured at each stage of the polishing and controlled to be the same at the end of the polishing.
To simulate the high-temperature operating environment, the thermal cycle test and the thermal shock test were performed. An electric sintering furnace (Ajeon Heating Industrial Co. Ltd, Korea) was used to perform the thermal cycle test by elevating the temperature from room temperature to a target temperature, exposing a specimen to the high temperature for a certain period of time, and then lowering the temperature to room temperature through cooling. The cycle was repeated until the interface was exfoliated. To minimize the thermal shock caused by the temperature change, the heating and cooling rate was kept within 5°C/min. The cycle was repeated until the TBC layer was exfoliated by setting the target temperature to be 1275°C and 1350°C.
The thermal shock test was performed with a horizontally moving high-temperature chamber (Ajeon Heating Industrial Co. Ltd, Korea). A repeated cycle of thermal shock, from the maximum temperature of 1350°C to room temperature, was periodically applied in air. First, the TBC specimen was placed on a hot plate, which temperature was kept at 1000°C in the high-temperature chamber kept at 1350°C, and then the high-temperature chamber was moved from the top center of the specimen to expose the specimen to the air for cooling for five minutes. The thermal shock cycle was repeated until the specimen was exfoliated.
Before the thermal cycle test and the thermal shock test, the pores formed on the surface were observed by optical microscope, and the porosity was measured using an image analyzer. The porosity was determined by first calculating the total area of the pores, and then dividing the area of the total microscopic image. The average porosity was calculated after observing more than ten sites.
To analyze the thermally grown oxide (TGO) layer after the thermal shock test, the cross-section of the TBC was polished, and the polished cross-section was observed by SEM.
A spherical indentation (or Hertzian indentation) 10,11) was performed to evaluate the degradation of the mechanical properties before and after the thermal shock test, by measuring the displacement of the indentation under the indentation load. The indenter used was a spherical WC ball having a radius of 3.185 mm, which was attached to a jig of a universal testing machine (Instron5567, Instron Co., U.S.A.). The indentation load was increased to a maximum load of P = 1500 N at a rate of 0.2 mm/min. Immediately after reaching the maximum load, unloading was performed at the same rate. When the load was increased, the indentation displacement for each load was measured using an extensometer. The measurement was performed at ten sites on the TBC layer to calculate the average load value of each load for analysis.
As another method of evaluating the degradation of the mechanical properties, a contact fatigue test was performed with a hydraulic fatigue tester (Instron 8800/8841, Instron, Co. Ltd., U.S.A). A variable sinusoidal load was applied at the frequency f = 5 Hz under compressive loads of 500 N and 50 N, using the same ball. The test was repeated up to n = 104. After the test, the damage on the surface of the TBC was observed by optical microscope, and the size of the damage was measured and compared.
As a method of evaluating the durability of the TBC against surface abrasion, a rotational wear tester (R&B, Korea) was used to keep the same spherical WC ball in contact with the TBC surface at a constant load of P = 30 N, sliding the ball along a circular track with a radius of r = 10 mm for 1800 cycles. During the motion along the circumference of the track, the frictional coefficient was measured, to monitor its variation. The weight of the TBC before and after the wear test was measured to compare the amount of abrasion.
3. Results and Discussion
Figure 1 shows the SEM images of the starting raw materials used for the coating of the TBCs. For the TBC materials to be coated at a uniform thickness and density, the starting raw materials need to be effectively transported with the carrier gas in the plasma coating equipment. Since the flowability of the raw materials needs to be high, the raw materials were prepared with a spherical shape.
The mean particle size, particle size distribution, and shape of the raw materials are known to play a critical role in the microstructure of the final coating materials. 12) In the present study, to prepare the raw materials in a spherical shape, the starting raw materials of the TBCs were prepared by spray drying, which resulted in different granule shapes. Fig. 1(a) shows a granule with a relatively hollow spherical shape, while Fig. 1(b) shows a granule with a relatively dense and solid spherical shape. As can be seen from the SEM images, the mean granule sizes were similar, about 100 μm, although the shapes were different.
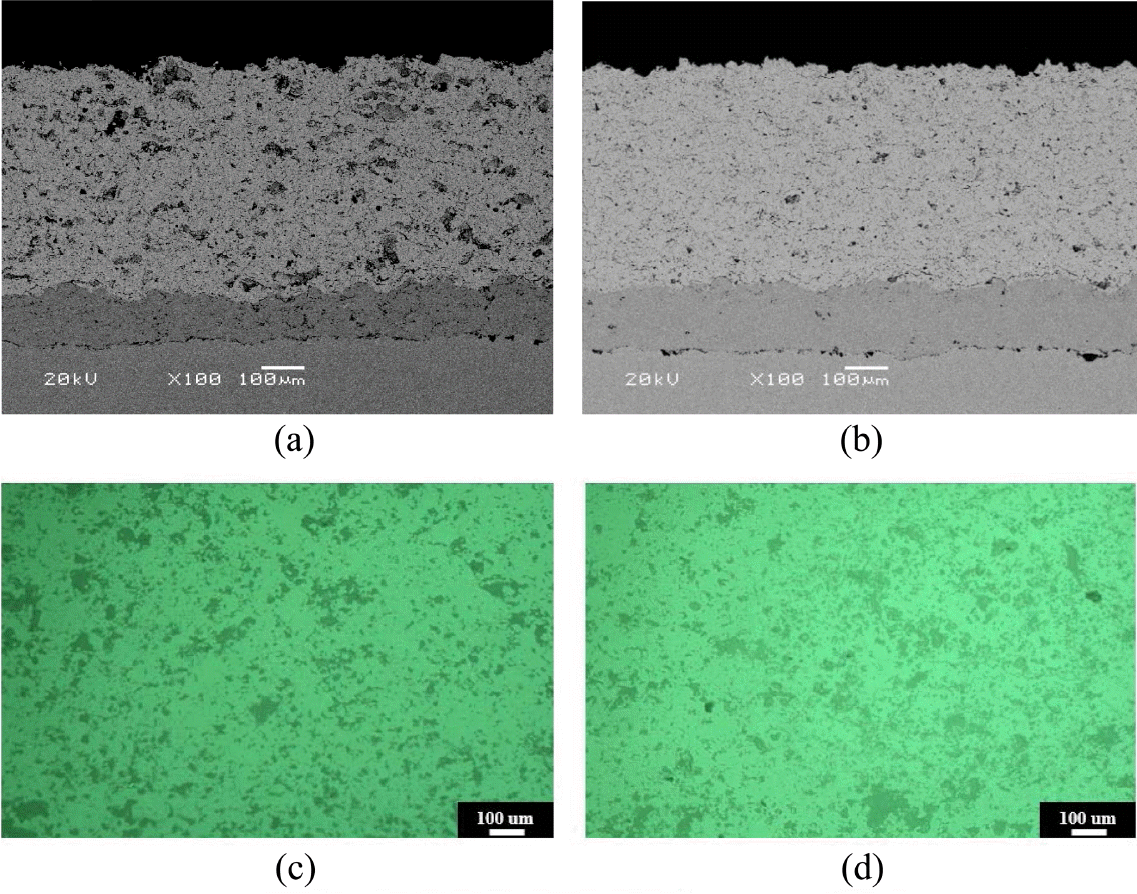
Figure 2(a) is a SEM image of the section view of the coin specimen coated by air plasma spray with the hollow spherical granule shown in Fig. 1(a), and Fig. 2(b) is a SEM image of the specimen coated with the dense spherical granule in Fig. 1(b). These images also show that both of the specimens, coated with the hollow spherical granule and the dense solid spherical granule, were prepared to have a similar topcoat thickness of 500 to 530 μm. Figs. 2(c) and 2(d) are the optical microscopic images of the surface of the specimens coated with the hollow spherical granule and the dense solid spherical granule, respectively.
As can be seen from the images, under the air plasma formulation conditions in the present study, a relatively porous TBC was obtained from the hollow spherical granule, while a relatively dense TBC was obtained from the solid spherical granule. Since the plasma formulation conditions for coating were the same, the initial shape of the spherical powder may have affected the final microstructure.
The porosities of the microstructures were significantly different. The analysis of the surface porosity based on the optical microscopic images showed that the average porosity of the porous TBC was 16% (± 0.15) and that of the dense TBC was 11% (± 0.7). Porosity has been known to greatly contribute to the thermal barrier effect. 13) Since it is also known that a TBC whose porosity is controlled to be about 10% to 15% has excellent mechanical durability, in addition to the thermal barrier effect, the result of the TBC durability testing performed in the present study may be considered significant. With regard to evaluating the durability of TBCs, the results of previous durability tests performed at temperatures around 1100 to 1200°C have been published in many reports, however, there are relatively few studies conducted at a temperature as high as 1350°C. This is because most metals undergo rapid oxidation at such a high operating temperature, resulting in a rapid decrease in thermal durability.
In the thermal cycle test in the present study, interface exfoliation did not occur up to 10 thermal cycles at 1275°C for both the porous TBC layer and the dense TBC layer, as shown in Fig. 3(a). However, when the temperature was increased to 1350°C, interface exfoliation occurred in one thermal cycle in the dense TBC layer having the microstructure shown in Figs. 2(b) and 2(d), and by two thermal cycles in the porous TBC layer having the microstructure shown in Figs. 2(a) and 2(c). This thermal durability was similar or better than the thermal durability data reported by James Smlalek and others, 14) who employed the EB-PVD coating method and a single crystal substrate, which are known to give better durability. Since a general Ni-superalloy-based substrate was used in the present study, the TBCs prepared in the present study might have served as effective thermal barriers. The bar graph in Fig. 3(b) shows the results of the thermal shock test. As can be seen from the graph, even when exposed to repeated thermal shocks by cycling from the high temperature of 1350°C to room temperature, interface exfoliation of the dense TBC occurred after just 210 cycles. In contrast, interface exfoliation of the porous TBC occurred after 420 cycles, indicating that the porous TBC has higher thermal durability.
Figure 4 shows the SEM image of the polished interface after the thermal durability test. The SEM image shows a TGO phase observed at the upper region of the interface between the topcoat layer and the bondcoat layer. This indicates a metal oxide was generated when oxygen on the surface was diffused to the metal bondcoat layer by ion conduction. It is known that the main composition of the TGO is the α-Al 2O 3 phase, which reacts with the NiCoCrAlY bondcoat to produce a small amount of (Ni,Co)(Al,Cr) 2O 4 phase. 14) The TGO layer, generated by thermal exposure in an oxygen atmosphere, becomes thicker as the high-temperature retention time is increased, and is exfoliated when the thickness becomes about 10 μm, approximately about 6 to 7 μm. 15)
The thermal expansion coefficient of the TGO layer is significantly different from that of the bondcoat layer or the topcoat layer, and consequently the exfoliation is considered to be the result of stress differences between the materials. 5) Fig. 4(a) is the image of the TGO observed on the cross-section of the porous TBC layer after the thermal durability test, and Fig. 4(b) is the image of the TGO on the relatively dense TBC layer. The thickness of the porous TBC layer is estimated to be about 6 to 7 μm, and that of the dense TBC layer about 10 μm. This result is highly consistent with the results of the thermal durability test shown in Fig. 3. The pores of the porous TBC layer may suppress the growth of the TGO layer in the same thermal environment, resulting in the excellent thermal durability shown in Fig. 3.
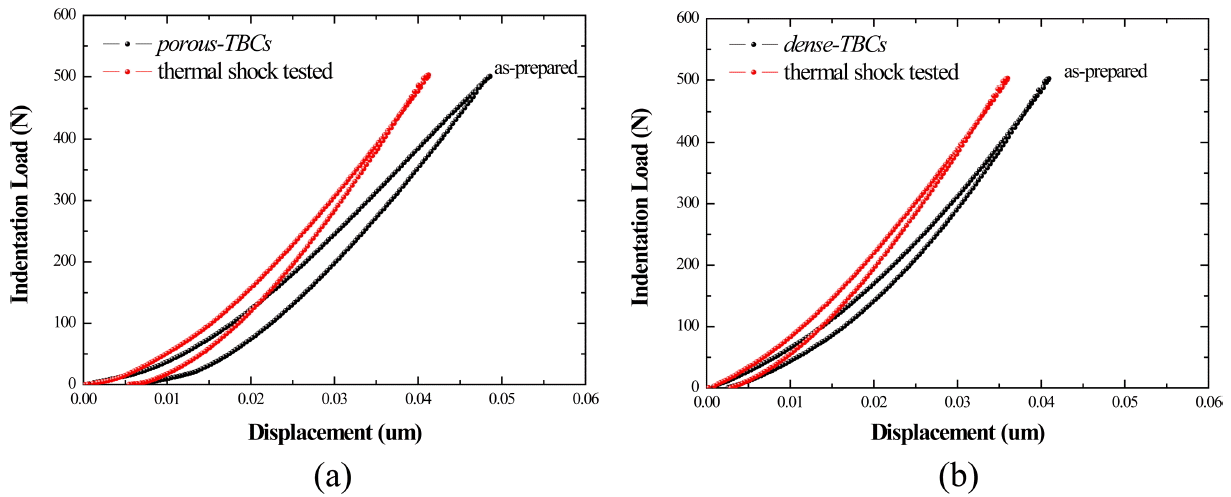
Figure 5 shows the load-displacement curves of the indentation test. The indentation was performed using a spherical WC ball with a radius of 3.18 mm, by applying a maximum load of 500 N on the polished TBC surface at a rate of 0.2 mm/min and the removing the load at the same rate. Figs. 5(a) and 5(b) respectively show the indentation test results obtained with the porous TBC layer and the dense TBC layer. In addition, plots show the indentation test results of the samples before and after the thermal shock cycles, from the highest temperature of 1350°C to room temperature.
Comparison of the samples before the thermal shock test indicates that the indentation displacement of the porous TBC was about 0.05 mm (50 μm) at the maximum load of 500 N, while that of the dense TBC was smaller, 0.04 mm (40 μm) at the maximum load of 500 N. The slope of the curve was also larger in the dense TBC, both when the load was increased to the maximum and when the load was decreased from the maximum, indicating that the dense TBC has a larger elastic modulus.
The residual displacement, defined as the difference in the initial displacement (zero) and the displacement after removing the load, is related to the hardness of a material: a larger residual displacement corresponds to a lower hardness value. Hence, the test results indicate that the dense TBC has a higher hardness value. Therefore, the dense TBC showed better mechanical properties than the porous TBC in terms of hardness and elastic modulus.
On the other hand, a comparison of the indentation load-displacement curves before and after the thermal shock test showed that the curves were shifted in the direction of higher elasticity and higher hardness in both the dense and porous TBCs. This was because of the sintering that takes place when a TBC is exposed to high temperature. Sintering of the TBC was also reported in another study. 14)
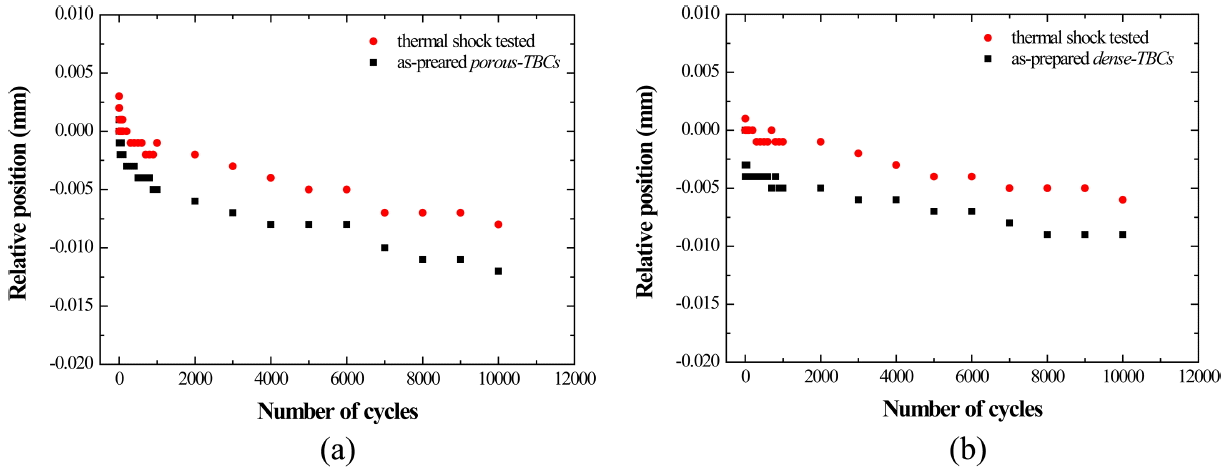
Figure 6 shows the relative ball position during a contact fatigue test that was performed by applying a variable load ( P = −500 N to −50 N) to the surface with a spherical WC ball of the same size for 10,000 times at a frequency of 5 Hz. Comparison of the samples before the thermal shock test showed that the indentation displacement of the porous TBC was about 0.013 mm (13 μm) at the maximum indentation number of 10,000 times, and that of the dense TBC was smaller, at about 0.009 mm (9 μm).
When the variable load was applied to the surface with the WC ball, the relative position of the ball was gradually lowered, which is closely related to the wear of the material. Since the YSZ TBC material used in the present study is a ceramic material having a relatively high fracture toughness, rather than cracking caused by brittleness, a zone of material damage caused by wear due to mutual friction between grains was found in the indentation test. 16) After the thermal shock test, although the ball position was lower, the lowering of the ball position was smaller in comparison with the measurement before the thermal shock test, indicating that the mechanical properties might have been increased due to sintering during the thermal shock test. Therefore, the contact fatigue test also showed that the resistance was better in the dense TBC.
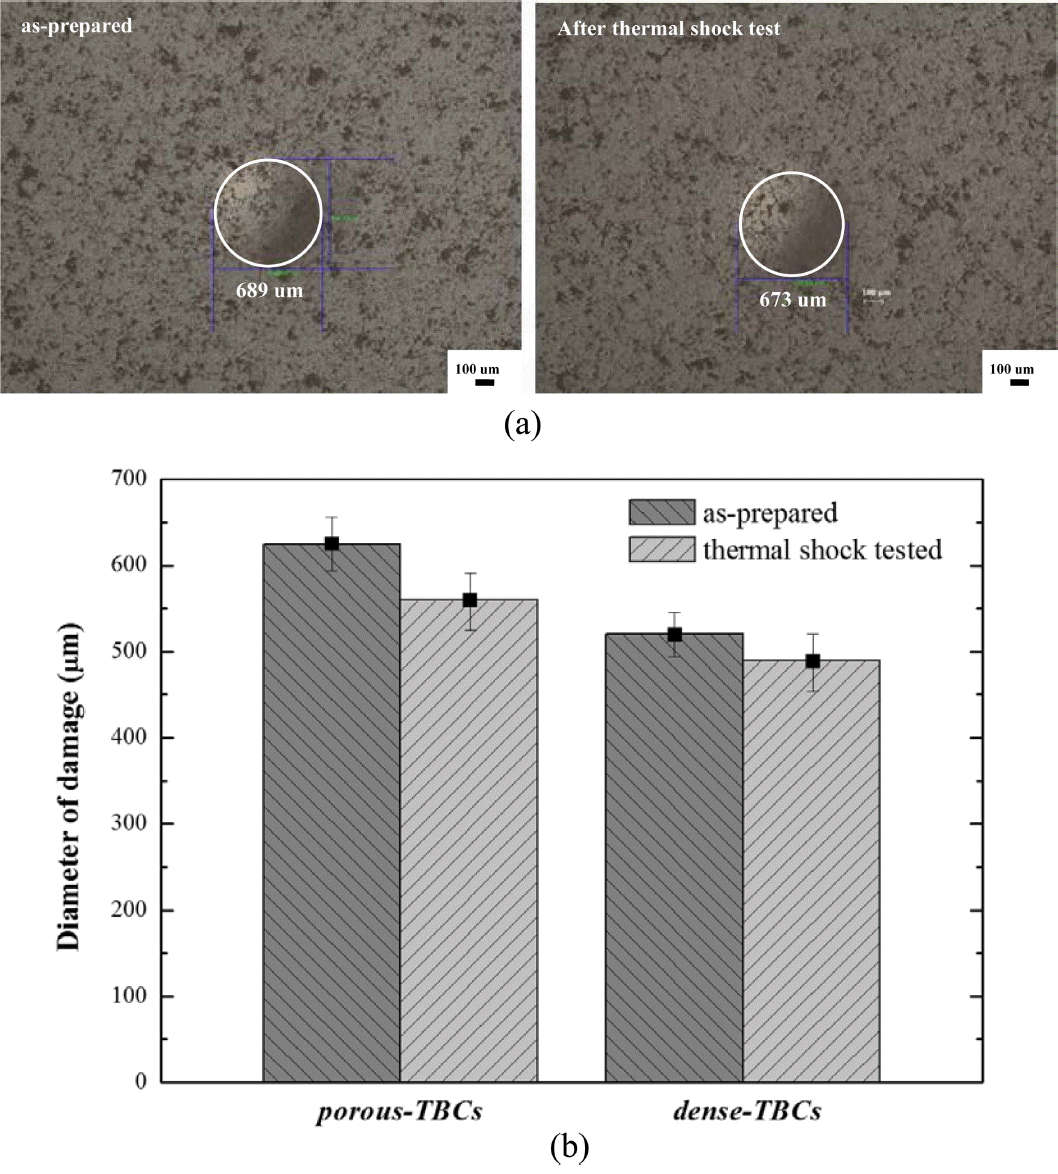
Figure 7(a) shows an optical microscopic image of the damaged zone on the surface after the contact fatigue test. As in the previous study, no cracking by indentation was found, but damage by wear due to shear stress was found at the indentation region.
Figure 7(b) shows the size of the indentation damage depending on the porosity of the TBC materials, and the performance of the thermal shock test. The plot in Fig. 7(b) also shows that in the dense TBC the size of the indentation damage was smaller and further decreased by the thermal shock test, indicating that the mechanical properties of the dense TBC were better and that the resistance to the variation of the contact load was increased after the thermal shock test.
A ball-on-disk wear test was performed with the same ball of the same material in contact with the surface by rotating the ball. Fig. 8 shows the variation in the frictional coefficient that occurred during the test. Uneven wear was found in the dense TBC because of the processing difference during the polishing of the sample, but the overall frictional coefficient was smaller than that of the porous TBC. This result is consistent with the abovementioned trends of the indentation load-displacement, the ball position during the contact fatigue test, and the size of damage after the contact fatigue test, confirming the excellent mechanical properties of the dense TBC, especially its wear resistance. The increase in the frictional coefficient of the porous TBC may be caused by the effect of small pores on the friction. After the thermal shock test, the frictional coefficient of the porous TBC did not significantly change, but that of the dense TBC was increased as the density was increased due to sintering. This is also consistent with the trends discussed above. The trend in wear loss was the same, because the wear loss of the dense TBC was smaller than 1 mg, indicating excellent wear resistance.
4. Conclusions
In the present study, to evaluate the durability of thermal barrier coatings of high-temperature gas turbine parts, bond-coating was performed by HVOF on a Ni superalloy substrate to a thickness of 180 to 220 μm, and a TBC material was then applied by coating a YSZ layer using air plasma with a thickness of about 500 μm top of the bondcoat.
Thermal cycle tests and thermal shock tests were performed using coin-type specimens coated with the TBC material at a maximum temperature of 1350°C. The mechanical properties of the specimens before and after the thermal shock test were investigated by performing an indentation test, a contact fatigue test, and a wear test using a spherical WC ball. The following conclusions were drawn from the test results.
A relatively porous TBC and a relatively dense TBC were prepared by controlling the shape of the TBC granules in the same spray process. In the thermal cycle test, interface exfoliation did not occur when the thermal cycle was applied at 1275°C for one hour for 10 cycles, but it occurred when the thermal cycle was applied at 1350°C for one hour in the dense TBC, after one cycle, and in the porous TBC, after two cycles. In the thermal shock test, interface exfoliation occurred at 210 cycles in the dense TBC, while it occurred at 420 cycles in the porous TBC, indicating that the porous TBC had higher thermal durability. In the indentation test, the indentation displacement was decreased in both the porous TBC and the dense TBC after undergoing the thermal shock test. In addition, the residual indentation displacement was smaller in the dense TBC. This result showed that the dense TBCs have excellent resistance to stress caused by direct external contact even after the thermal durability test. Similar to the indentation rest results, the contact fatigue test also showed that the relative displacement of the indenter decreased after the thermal shock test. In addition, the change in the relative indenter position was smaller in the dense TBC than in the porous TBC in the early stages of the repeated fatigue application. This showed that the dense TBC has a better resistance to contact fatigue than the porous TBC. In the wear test, the resistance to friction was improved in the dense TBC specimen after the thermal shock test due to the sintering of the TBC material. The test results showed that the contact wear durability was higher in the dense TBC than in the porous TBC. Summarizing the results of the high-temperature thermal cycle test and thermal shock test, the thermal durability, including resistance to interface exfoliation, was higher in the porous TBC, but the mechanical properties, as evaluated by the indentation test, fatigue test, and wear test, were better in the dense TBC. Therefore, the two types of TBCs should be applied selectively after considering the operating conditions of different parts.
Acknowledgements
This work was supported by the IT R&D program of MOTIE/KEIT [NO. 10043795, Development of Materials for Gas Turbine Operated at 1600°C for High-Efficiency Power Generation]; we wish to thank Prof. Yeon-Gil Jung for discussions and SEM observations.
Fig. 1
SEM micrographs of starting spray dried granules for thermal barrier coatings for (a) porous-TBCs and (b) dense-TBCs. 
Fig. 2
SEM micrographs showing sectional view (a,b) and optical micrographs showing surface view (c,d) for porous-TBCs (a,c) and dense-TBCs (b,d). 
Fig. 3
Thermal cycles to exfoliation of TBCs by (a) thermal cycling test and (b) thermal shock test. 
Fig. 4
SEM micrographs showing section including TGO of (a) porous-TBCs and (b) dense-TBCs. 
Fig. 5
Plots of indentation load-displacement before and after exposure to thermal shock test of (a) porous-TBCs and (b) dense-TBCs. 
Fig. 6
Plots of relative position during contact fatigue before and after exposure to thermal shock test of (a) porous-TBCs and (b) dense-TBCs. 
Fig. 7
(a) Optical micrographs of surface damage by contact fatigue test and (b) plots of damage size before and after exposure to thermal shock test of porous and dense-TBCs. 
Fig. 8
Plots of friction coefficient according to rotating cycles before and after exposure to thermal shock test of (a) porous-TBCs and (b) dense-TBCs. 
REFERENCES
1. V. Kumar, and B. Kandasubramanian, “Processing and Design Methodologies for Advanced and Novel Thermal Barrier Coatings for Engineering Applications,” Particuology, 27 1-28 (2016).  2. YS. Heo, DH. Lee, Y-G. Jung, and KS. Lee, “Indentations on Air Plasma Sprayed Thermal Barrier Coatings Prepared by Different Starting Granules,” J Nanomater, 16 [1] 340(2015).   3. NP. Padture, M. Gell, and EH. Jordan, “Thermal Barrier Coatings for Gas-Turbine Engine Applications,” Science, 296 [5566] 280-84 (2002).  4. MP. Schmitt, AK. Rai, R. Bhattacharya, D. Zhu, and DE. Wolfe, “Multilayer Thermal Barrier Coating (TBC) Architectures Utilizing Rare Earth Doped YSZ and Rare Earth Pyrochlore,” Surf Coat Technol, 251 56-63 (2014).  5. AG. Evans, DR. Mumm, JW. Hutchinson, GH. Meier, and FS. Pettit, “Mechanism Controlling the Durability of Thermal Barrier Coatings,” Prog Mater Sci, 46 [5] 505-53 (2001).  6. AG. Evans, and JW. Hutchinson, “The Mechanics of Coating Delamination in Thermal Gradients,” Surf Coat Technol, 201 7905-16 (2007).  7. WR. Chena, X. Wua, BR. Marpleb, DR. Nagyc, and PC. Patnaika, “TGO Growth Behavior in TBCs with APS and HVOF Bond Coats,” Surf Coat Technol, 202 2677-83 (2008).  8. X. Chen, R. Wang, N. Yao, AG. Evans, JW. Hutchinson, and RW. Bruce, “Foreign Object Damage in a Thermal Barrier System: Mechanism and Simulations,” Mater Sci Eng A, 352 [1] 221-31 (2003).  9. C. Kim, YS. Heo, TW. Kim, and KS. Lee, “Fabrication and Characterization of Zirconia Thermal Barrier Coatings by Spray Drying and Atmospheric Plasma Spraying,” J Korean Ceram Soc, 50 [5] 326-32 (2013).  10. BR. Lawn, “Indentation of Ceramics with Spehres: A Century after Hertz,” J Am Ceram Soc, 81 [8] 1977-94 (1998).  11. DH. Lee, and KS. Lee, “Mechanical Behavior of Layered YSZ Thermal Barrier Coatings using Indentation Test,” J Korean Ceram Soc, 48 [5] 396-403 (2011).  12. G. Bertrand, P. Bertrand, P. Roy, C. Rio, and R. Mevrel, “Low Conductivity Plasma Sparyed Thermal Barrier Coatings using Hollow PSZ Spheres: Correlation between Thermophysical Properties and Microstructure,” Surf Coat Technol, 202 1994-2001 (2008).  13. L. Lelait, S. Algerian, and R. Mevrel, “Alumina Scale Growth at Zirconia-MCrAlY Interface: a Review of Recent Work,” J Therm Spray Technol, 18 [5-6] 809-21 (2009).  14. JL. Smialek, “Compiled Furnace Cyclic Lives of EB-PVD Thermal Barrier Coatings,” Surf Coat Technol, 276 31-8 (2015).  15. L. Lelait, S. Algerian, and R. Mevrel, “Alumina Scale Growth at Zirconia-MCrAlY Interface: A Microstructural Study,” J Mater Sci, 27 5-12 (1992).  16. BR. Lawn, SK. Lee, IM. Peterson, and S. Wuttiphan, “Model of Strength Degradation from Hertzian Contact Damage in Tough Ceramcs,” J Am Ceram Soc, 81 [6] 1509-20 (1998). 
|
|


